In this article, you will learn about the main functional areas of edoc invoice. The available functions are displayed according to the permission granted.
The application is divided into several areas:
-
You will find basic functions (1 and 2) on the main bar of the application.
-
The ribbon offers you the workflow functions, further options for editing or adding file notes or additional documents as well as a view of the invoice document (3 and 4).
-
In the capture area of the invoice (capture form), all details are grouped together for editing (5–11).
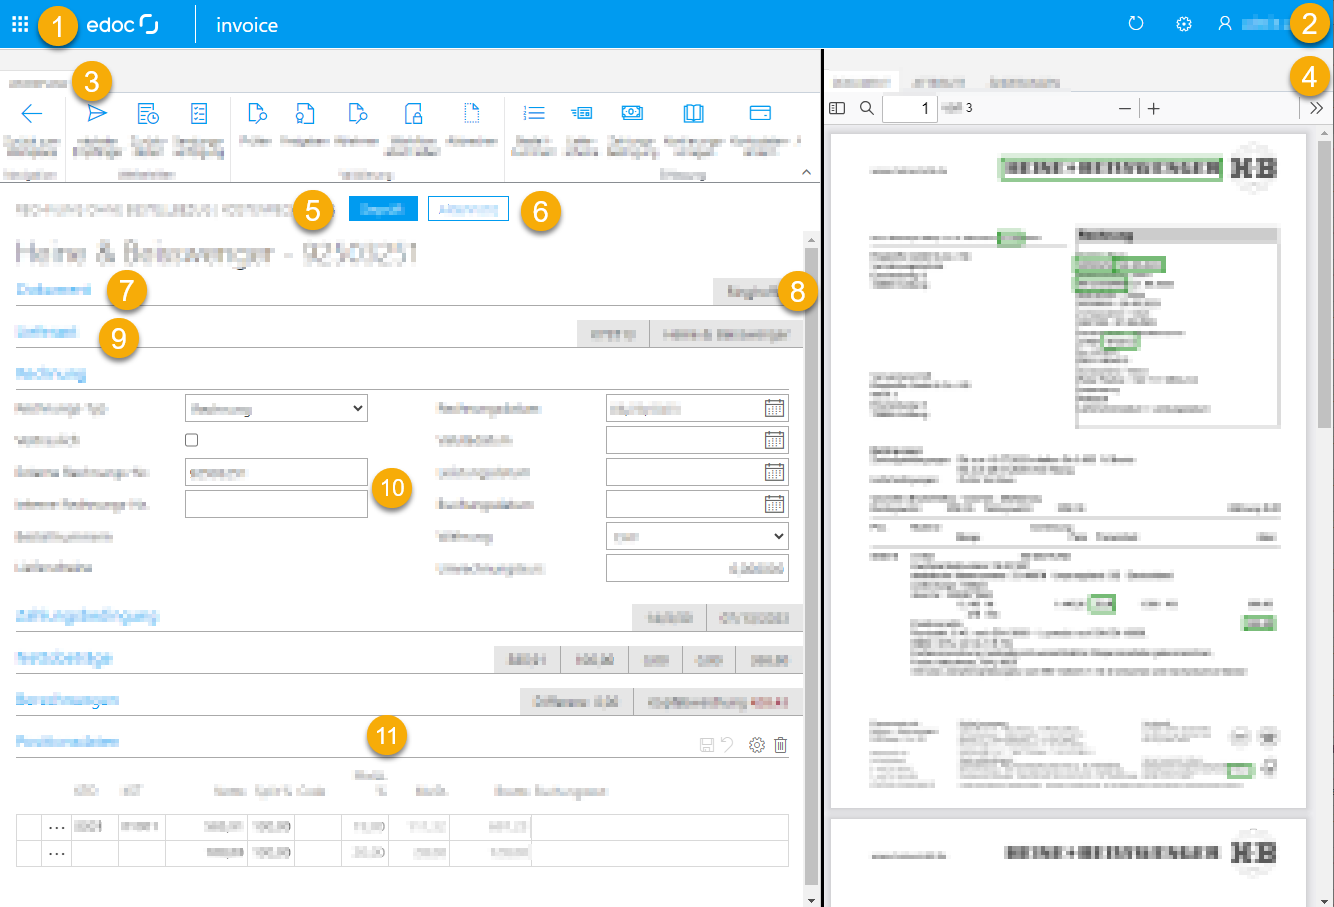
Overview of key functions
-
App menu: If you use several edoc apps, you can select the apps in the app menu.
-
Functions for personal use:
-
Use the cogwheel symbol to open the region settings.
-
Click on your name to open your personal settings.
-
Under User settings, you can access the settings for workflow notifications and delegation settings.
-
You can change the language under Language settings. This function is only available in conjunction with edoc workplace.
-
Click Logout to sign out of the application.
-
-
Menu ribbon when editing invoices: In the ribbon, you will find the functions that are available for an invoice in your workflow step. The available functions may vary depending on the workflow step and your permissions.
-
Detailed views of an invoice (only in conjunction with edoc workplace)
-
You can display various summaries under individual detail views Document, Attributes or Changes. If you select Document, for example, the invoice is displayed. Under Changes, you can see all the changes that have been made to an invoice in the capture form. If a workflow has been defined for the document, you will also see the Workflow tab. If a file has been defined for the document, you will also see the File tab. If an invoice exists as an XML file, you will also see the XML view tab.
-
-
Invoice category: For each invoice, you can see which category the invoice is assigned to. Different workflows or verification steps can be defined in an organization for each category. There are two categories:
-
Invoice without order reference | Invoice without order reference
-
Invoice with purchase order reference | Invoice for goods
-
-
Stamps on an invoice: The so-called digital stamps on an invoice show you which verification steps have been carried out for the invoice. The stamps are interactive. By clicking on a stamp, you can see which details have been entered for the actions and a history. Examples:
-
Stamp Verified: The stamp indicates that a verification step has been completed with the Verification action.
-
Stamp Approved: The stamp indicates that an invoice has been approved.
-
Additional documents stamp: The stamp indicates that there are additional documents for an invoice, e.g. timesheets.
-
-
Sections of an invoice: An invoice is divided into different sections in the capture form. The subdivision allows you to quickly find the relevant details. The Invoice section is displayed in full by default. You may need to open other sections individually by clicking on the blue title with the mouse. If you see the note Show more, click on it to display further information.
-
Summaries for collapsed sections: If sections are collapsed, you will always see a summary of the key data. In the Payment term section, for example, you can see the specific due date and the number of days in which the net amount is due.
-
Mouse pointer "Hand": If the mouse pointer changes to a hand, you can open a section with one click.
-
Editable fields of an invoice: Depending on the field type, you can select a date from a calendar or from a selection list (drop-down menu). In other fields, you can enter invoice numbers manually, for example.
-
Account assignment block "Line item data": In the Line item data section, you can, for example, add the account, cost center or cost object and much more.