This example shows you how to create a simple vacation request.
The scenario is as follows: employees (team members) can submit a new vacation request, specifying the start date and end date with an additional comment. The vacation request is sent and then approved by the team leader (a specific person). The team member then receives a notification that the leave request has been processed.
Prerequisites for this example scenario
-
You have already created an app and know the basic functions of edoc automate.
-
You have a basic understanding of BPMN (Business Process Modeling Notation).
Create the flow
First, you must create a new flow with the name Vacation request.
You may only enter the name of a flow once on the entire server. If there is already a flow with the same name, select a different name. Take this into account in the following steps and adjust the name if necessary.
For information about creating and designing a flow see: Create and model a flow in edoc automate
You need the following workflow variables for the vacation request:
-
ApplicantPerson (string, required): for the team member (user) who submitted the request (see permissions\CurrentUser - edoc automate).
-
Team leader (string, required): for the team leader of the applicant.
-
Start (date, required): for the date of the first day of the requested period.
-
End (date, required): for the date of the last day of the requested period.
-
Comment (string): for the comment of the requesting person.
-
CommentTeammanagement (string): for the comment of the team leader.
-
Approve (string): for the status of the leave request, e.g. Approved or Rejected.
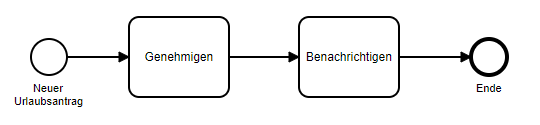
The flow for the leave request is structured as follows in this scenario:
There is the Start event and two simple Task elements that are used to approve the leave request and notify the applicant.
Use views for the workflow steps
Before you design the process in the Workflow Designer, you must create the required views in order to be able to assign them to the tasks in the flow.
The individual steps for creating views with the corresponding actions can be found here: Create and use a view in edoc automate
All views that you want to use in the flow require an individual route that is used to call up the view when the workflow task is opened.
You can design the dialogs and user interface as you wish. Condition: the specified components must be included in the views and the names of these components must be based on the names of the workflow variables so that they can be automatically assigned by edoc automate.
The Input, Text, TextEdit, and Hidden components are automatically initialized with the value of a workflow variable, but only if the name matches.
The value of the variable must be updated with an action (workflow\SetVariable - edoc automate).
"New vacation request" view
This view is used to create a new vacation request, initially define the workflow variables and start the flow.
The view must contain at least the following components:
|
Name |
Component type |
Label/value |
|---|---|---|
|
Start |
DateTimeInput |
Start date |
|
End |
DateTimeInput |
End date |
|
Comment |
TextEdit |
Comment |
|
- |
Button |
Submit vacation request |
You must create an action of type workflow\CreateInstance for the button.
Here's how
-
Create a new action for the Submit vacation request button and select the type workflow\CreateInstance.
-
Select the flow Vacation request under Parameters > Flow.
-
Fill the previously specified variables with the corresponding values of the components contained in the view, e.g. with the action default\GetValue.
"Approve" view
With this view, the vacation request is approved or rejected by the team leader and then forwarded to the team member.
Tip
To provide the selection options for approval (Approved, Rejected), use the Select component.
For more information see: list\Select - edoc automate
The view must contain at least the following components:
|
Name |
Component type |
Label/value |
|---|---|---|
|
Start |
DateTime |
Start date |
|
End |
DateTime |
End date |
|
Comment |
Text |
Comment |
|
CommentTeammanagement |
TextEdit |
Comment from the team leader |
|
Approve |
Select |
Approve |
|
- |
Button |
Submit |
To forward the task in the flow, use the workflow\CloseTask action for the Submit button.
Here's how
-
Create a new action of type workflow\CloseTask for the Submit button.
-
Select the value auto for the Redirect parameter to automatically go to the workplace when the task is completed.
"Notify" view
The view informs the team member (requesting person) about the status of the leave request. The team member completes the workflow with the Complete button.
The view must contain the following components:
|
Name |
Component type |
Label/value |
|---|---|---|
|
Start |
DateTime |
Start date |
|
End |
DateTime |
End date |
|
Comment |
Text |
Comment |
|
CommentTeammanagement |
Text |
Comment from the team leader |
|
Approve |
Text |
Status |
|
_ |
Button |
Complete |
To forward the task in the flow, use the workflow\CloseTask action (as in the previous steps) for the Complete button.
Assign the views to the workflow steps
Once you have created the views, you must assign these views to the individual Approve and Notify workflow steps.
For information about assigning a view to a step, see: Use views in the individual steps of a flow
For the Approve step, you must use the Team leader variable for Users. For the Notify step, use the ApplicantPerson variable to return the flow.
The workflow is now complete.
After completing the leave request workflow: Submit a new leave request
Once the vacation request has been approved or rejected, the workflow is complete. Now your users can only submit a new vacation request: to start a new flow instance, you need to call up the New vacation request view, fill out the form and click on the Submit vacation request button.