In this example scenario, you will learn how to create a simple view with which you can add data to a database and query it again.
You will learn examples of how to combine components with other components, add corresponding actions, validate and execute the app.
Prerequisites for this example scenario
-
You have already created an app and know the basic functions of edoc automate.
-
You have a MySQL database in which the data in this example is stored and read out. You can use the database instance provided on the edoc platform system environment for this purpose: app-server-mysql or call phpMyAdmin with /pma.
-
You have created the table todos in the MySQL database with the following columns and the following properties:
-
id:
int(11) NOT NULL AUTO_INCREMENT -
description:
varchar(100) DEFAULT NULL -
done:
bit(1) NOT NULL
-
-
Alternatively, you can use the following SQL script:
CREATE TABLE todos (
	id INT NOT NULL AUTO_INCREMENT PRIMARY KEY,
description varchar(100) DEFAULT NULL,
done bit(1) NOT NULL DEFAULT 0
);
Establish a connection to the data source in the app
The first step is to establish a connection to the database in your app so that you can read or write the data in the app.
In the app details of your app, create a new MySQL data source with the name db under Datasources. You can also choose a different name. However, you must take this into account below when specifying the data source and adjust it accordingly in your app.
For information about the app details see: Manage app details in edoc automate
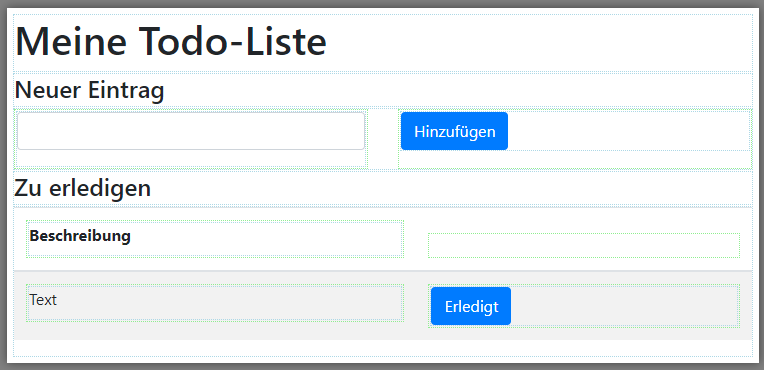
Create a view with components
Create a new view with various components. For information about creating a new view and adding components see: Create and use a view in edoc automate
Things to know
Each name may only occur once at the same level. However, you can reuse the name for a subcomponent.
The names for components in tables for displaying data must match the column names in database queries, as this is used to assign the data to a component.
Add the following components to the view one after the other and enter the corresponding properties for each component:
-
Title component with the following details: Under Value , enter My todo list. Set the value for Size to 1.
-
Title component with the following details: Under Value , enter New entry. Set the value for Size to 4.
-
Columns component with the following components:
-
Add the Input component to the first column. Enter the value description under Name.
-
Add the Button component to the second column. Enter the value Add under Value.
-
-
Title component with the following details: Under Value, enter To do. Set the value for Size to 4.
-
Component Table with the following details: Under Name, enter todolist. Set the value for Columns to 2 for Head Rows to 1 and for Data Rows to 1. Ensure the following: The name of the component must match the column names in a dataset (database query) so that the data is assigned correctly.
-
Add the Text component to the table in the first row of the first column. Enter the value Description under Value.
-
Add the Text component to the table in the second row of the first column. Enter the value description under Name. Under Value, enter the value Text.
-
Add the Button component to the table in the second row of the second column. Enter the value Done under Value.
-
You have successfully completed the first step. Be sure to save the view before you continue.
Next, add the action for reading the data to the Table component.
Add actions for reading data from the database
To display the data, you need an action that loads the data into the table and reads it from the database. For information about creating a new view see: Create actions for a view
Here's how
-
Select the Table component (todolist) in the view.
-
Create a new action with the load event.
-
Select default\SetDataset as the type of action.
-
Enter the name Load data for the action.
-
Add a new action as a parameter with the icon for adding actions that reads the data from the database:
-
Select database\Query as the type for the action.
-
Enter the created data source db under datasource.
-
Enter this SQL query under query:
SQLSELECT * FROM `todos`
-
-
Click on Apply.
-
For the Load action, select the table in the view under Returnfields so that the name of the table (todolist) is displayed under Returnfields.
-
Click on Apply.
Be sure to save the view before you continue. Next, add the actions for saving the data to the Button component.
Add actions to save the data in the database
To save the data, you need an action to transfer the data to the database and an action to read the data from the Description field.
Here's how
-
Select the Add button.
-
Create a new action under Events > New Action with the click event.
-
Select database\Query as the type of action.
-
Enter the following data in the Parameters section:
-
Enter the created data source db under datasource.
-
Enter this SQL query under query:
SQLINSERT INTO `todos` (`description`) VALUES (:desc)
-
-
Enter the value desc under params > key.
-
Under params > value, add a new action with the icon for adding actions that saves the data to the database:
-
Select default\GetValue as the type for the parameter action.
-
Select the Input component description in the Parameters section using the add icon. To be on the safe side: You have added the Input component to the Columns component. If required, you can display the properties of the components under Properties. Make sure that you do not select the Text component with the name description in the table.
-
-
Click on Apply.
In this step, you have created the action that reads the value from the Input component and writes it to the database. Be sure to save the view before continuing.
Next, add an action to reload the data after users have saved an entry.
Reload the displayed data after insertion
After your users have added new data to the list, the table must be reloaded. For this purpose, you do not need to create new actions that read data from the database. You can simply use the existing actions by configuring another event for the Add button.
Whenever you want to link actions, you must ensure that the actions have a name. If the linked actions are not displayed, save the app first.
Here's how
-
Select the Add button.
-
Create a new action under Events > New Action with the click event.
-
Select default\Link as the type of action.
-
Enter the following data in the Parameters section:
-
Under Source, select the Table component todolist.
-
Under Action, select the action with the name Load data.
-
-
Click on Apply.
You have now created the action that reloads the values from the database. Be sure to save the view before continuing.
Next, implement a validation for the input field to prevent empty entries from being saved.
Implement field validation
To prevent empty entries from being written to the list, you can check the description input field (Input component) with the integrated field validation.
Here's how
-
Open the Click action to save the data on the Add button under Events > Click.
-
Add the validation in the Validation section of the action editor with Add:
-
Under Validator, select the Required type.
-
Under Message, enter any text that will be displayed to your users. Example: Please enter a text. Save the entry again.
-
Under Component, select the Input component description.
-
-
Click on Apply.
You have now created the validation when saving an empty field. Be sure to save the view before you continue.
Next, prepare to execute the view by creating a route.
Create a route for the "My to-do list" view
Before you can execute the view, you must specify a route.
Here's how
-
Click on Routes in the menu bar in the app.
-
Click on Add Route in the dialog.
-
Enter any route in the Path field, always with a leading slash, e.g.: /todo.
-
Click on Apply to accept the new route for the view.
-
Close the Routes dialog with Close.
You have created your own route for the view. Be sure to save the view before you continue.
Now you can test your view.
Practical test: Execute the "My to-do list" view
Once you have created the My to-do list view and added various actions, you can test the view in the browser: Click on Execute in the menu bar in the app.
Your view is opened as a web view in the browser.
If you have created several routes, you can select the appropriate route in a dialog.
Further ideas for a to-do list
-
In this scenario, all tasks are always loaded and the Done button has no function. As an optimization, implement the functionality for completing tasks and only display the unfinished tasks in the table.
-
In this scenario, some data may be missing that would help your users in their day-to-day work. In the table, display the creation date and completion date as well as the names of the people who created and completed a task.