In this example scenario, you will learn how to search and display documents that are located in the d.velop documents system (on-premises) in your app.
The view to be created has a two-column structure:
-
In the first column, users enter their search term and have a button that triggers the search. A table for the search result with the most important ECM data is displayed below this section.
-
In the second column, the ECM document is displayed using the viewer component.
Prerequisites for this example scenario
-
You have already created an app and know the basic functions of edoc automate.
-
You have already established a connection to the local ECM system of d.velop documents with a data source (e.g. with the name d3) in your app.
Create the view with components for searching and displaying ECM documents
Create a new view with various components. For information about creating a new view and adding components see: Create and use a view in edoc automate
Things to know
Each name may only occur once at the same level. However, you can reuse the name for a subcomponent.
Add the following components to the view one after the other and enter the corresponding properties for each component:
-
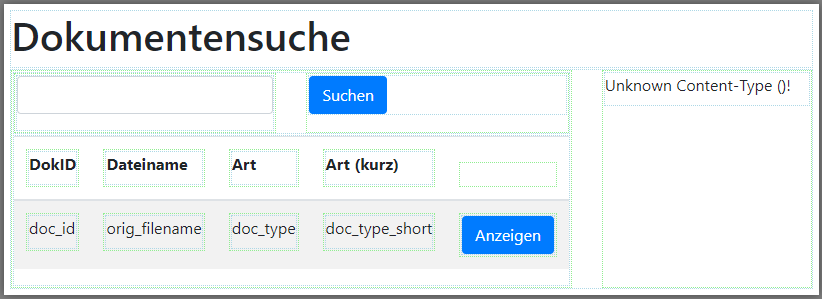
Title component with the following details: Under Value, enter Document search. Set the value for Size to 1.
-
Columns component with the following components:
-
Add the Columns component to the first column.
-
Add the Input component to the first column of the Columns component you have just added.
-
Add the Button component to the second column of the Columns component you have just added. Enter the value Search under Value.
-
-
Insert the Table component below the Columns component drag and drop the component into the first column of the Columns component.
-
Enter the value 5 under Columns to display five columns.
-
Enter the value 1 under Head Rows to display a title column.
-
Enter the value 1 under Data Rows to display a row.
-
Add the Text component to the first 4 columns of the FIRST table row to display column names for the search result.
-
Enter the following titles for the respective columns under Value: Doc ID, File name, Doc type, Doc type (short).
-
In the first 4 columns of the SECOND table row, add the Text component to display the technical names for the search result.
-
Enter the following parameter names for the respective columns under Name: doc_id, orig_filename, doc_type, doc_type_short. (In the screenshot, the names are also entered under Value for better traceability.)
-
In the 5th column of the second table row, add the Button component and enter the value Display under Value.
-
-
Add the Viewer component to the second column to display the document found.
-
Be sure to save the view before you continue. Next, add the actions for searching the ECM documents to the Button component.
Add actions to search for documents
To search for documents, you need an action that searches for and reads the data in the d.velop documents system.
For information about adding actions see: Create actions for a view
Here's how
-
Select the Search button in the Columns component.
-
Create a new action with the event click.
-
Select default\SetDataset as the type of action.
-
Enter the name Search documents for the action.
-
Add a new action as a parameter with the icon for adding actions that reads the data from the database:
-
Select d3\SearchDocument as the type for the action.
-
Enter the created data source d3 under datasource.
-
Enter e.g. searchtext_expression as a parameter in the Importparams section under key.
-
Under value for Importparams, add the action default\GetValue. Use this action to read the value of the input field.
-
Click on Apply until you see the Edit Action dialog with the click event.
-
-
Select the table in the view for the click event under Returnfields.
-
Click on Apply.
You can also specify other values as Importparams for the action. Possible values can be found in the documentation for the d.3 API (On-Premises).
Be sure to save the view before you continue. Next, add the actions for displaying an ECM document to the Button component.
Add actions to view a document
To display the documents found, you need actions that display the document in the Viewer component.
Here's how
-
Select the Show button in the Table component.
-
Create a new action with the event click.
-
Select default\SetDataset as the type of action.
-
Enter the name Show document for the action.
-
Add a new action as a parameter with the icon for adding actions that reads the data from the database:
-
Select d3\ViewDocument as the type for the action.
-
Enter the created data source d3 under datasource.
-
Specify the action default\GetValue for the docid parameter. Use this action to read the value of the Text component doc_id in the Table component.
-
Click on Apply until you see the Edit Action dialog with the click event.
-
-
Select the Viewer component in the view for the click event under Returnfields.
-
Click on Apply.
Be sure to save the view before you continue.
Next, prepare to execute the view by creating a route.
Create a route for the "Document search" view
Before you can execute the view, you must specify a route.
Here's how
-
Click on Routes in the menu bar in the app.
-
Click on Add Route in the dialog.
-
Enter any route in the Path field, always with a leading slash, e.g.: /d3docsearch.
-
Click on Apply to accept the new route for the view.
-
Close the Routes dialog with Close.
You have created your own route for the view. Be sure to save the view before you continue.
Now you can test your view.
Practical test: Execute the "Document search" view
Once you have created the Document search view and added various actions, you can test the view in the browser: Click on Execute in the menu bar in the app.
Your view is opened as a web view in the browser.
If you have created several routes, you can select the appropriate route in a dialog.